Get started with Duo Server
Prerequisites
Before you begin, ensure you have completed the following steps:
- Set up a Firebase Project and SSO:
- You can see more detailed in this guide.
- Get access to the Duo server:
- To use the server, you need to have access of the package
ghcr.io/silence-laboratories/dkls23-rs/duo-server:v5. Contact a Silence Laboratories team to get access.
- To use the server, you need to have access of the package
- Obtain NPM Token from Silence Laboratories:
- To install the
Silent Shard SDK, you will need an NPM token provided by the Silence Laboratories team. Please contact them directly to obtain this token.
- To install the
Login to Docker
- Login to docker using Personal Access Token(PAT) and your username.
Guide to generate GitHub Personal Access Token
- Go to GitHub Personal Access Tokens
- Click on "Generate new token", we are using the classic token for this guide.
- Enter a name for the token
- Select the "read::packages Download packages from GitHub Package Registry" scope.
- Generate the token.
Learn more about GitHub Personal Access Tokens here.
echo <PAT> | docker login ghcr.io -u <username> --password-stdin
Up and running Duo Server with Auth Service
You can run the Duo server with Auth Service using Docker. Below is a sample docker-compose.yml file that sets up the necessary services.
Save it as docker-compose.yaml
# docker-compose.yml
version: "3.9"

networks:
  duo-net:
    driver: bridge

services:
  duo-server:
    image: ghcr.io/silence-laboratories/dkls23-rs/duo-server:v5
    container_name: duo-server
    command: /usr/local/bin/sigpair-node
    environment:
      RUST_LOG: "info"
      LISTEN: "0.0.0.0:8080"
      DEV_MASTER_SIGN_KEY: /run/secrets/duo-signing-master-key
      FILE_STORAGE_URL: "file:///data/"
      # Auth hooks configuration
      AUTH_HOOK_TYPE: "webhook"
      AUTH_DKG_SETUP_VALIDATOR_URL: "http://auth-svc:9090/hook/dkg_setup_validation"
      AUTH_DSG_SETUP_VALIDATOR_URL: "http://auth-svc:9090/hook/dsg_setup_validation"
      AUTH_KEY_ID_NOTIFICATION_URL: "http://auth-svc:9090/hook/key_id_notification"
    ports:
      - "8080:8080"
    volumes:
      - duo-server-data:/data
    secrets:
      - duo-signing-master-key
    networks:
      - duo-net

  auth-svc:
    container_name: auth-svc
    image: ghcr.io/silence-laboratories/two-party-boilerplate-backend:06373aaf849597efea2367e7e4f3411359ac311e
    ports:
      - "9090:9090"
    volumes:
      - ./serviceAccountKey.json:/app/serviceAccountKey.json:ro
    environment:
      SECRET_KEY: ${DJANGO_SECRET_KEY} # MUST be set to a secure value for prod
      FIREBASE_CERT: "/app/serviceAccountKey.json"
      FEATURE_MOCK_FIREBASE: "false"
      FEATURE_KEYID_LOOKUP_BY_TOKEN: "true"
      FEATURE_ALLOW_ED25519: "true"
    depends_on:
      - duo-server
    networks:
      - duo-net


volumes:
  duo-server-data:

secrets:
  duo-signing-master-key:
    file: ./testdata/party_0_sk
Setup environment variables
Before launch, prepare environment variables by calling following script:
Save it as setup-env.sh and run with ./setup-env.sh
#!/bin/bash
set -e

ENV_FILE=env-file

rm -f $ENV_FILE
mkdir -p ./testdata
# Generate duo server signing key
openssl rand 32 > ./testdata/party_0_sk

# Configure Django secret key, used as a seed during secrets derivation by Django
echo DJANGO_SECRET_KEY=$(openssl rand -base64 64 | tr -dc 'a-z0-9!@#$%^&*(-_=+)' | head -c 48) >> ${ENV_FILE}

echo "Environment variables stored in $ENV_FILE"
The script will fill up env-file.
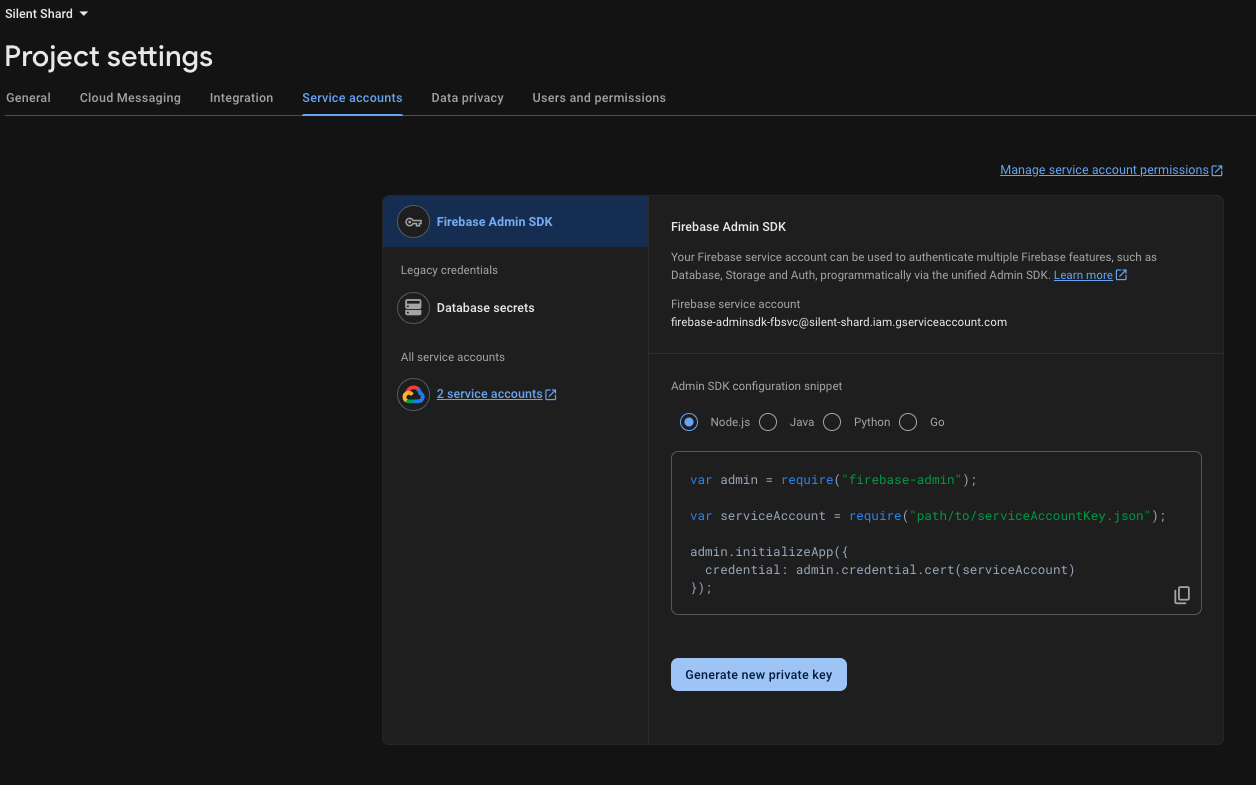
Obtain serviceAccountKey.json
serviceAccountKey.json is the Firebase service account key. This key is crucial for the Duo Auth Service server to securely communicate with your Firebase project and verify user identities.
How to obtain serviceAccountKey.json

Start services
docker compose --env-file env-file up
If everything was setup correctly, the server should be running with these logs
Attaching to duo-server-1
duo-server-1  | WARN: The dotenv file is not set
duo-server-1  | 2025-09-16T09:59:09.200234Z  INFO sigpair_node: Creating SimpleStorage
duo-server-1  | 2025-09-16T09:59:09.201975Z  INFO sigpair_node: Party VK <YOUR_CLOUD_VERIFYING_KEY_HEX_STRING>
duo-server-1  | 2025-09-16T09:59:09.202413Z  INFO sigpair_node: listening on 0.0.0.0:8080
Great! The server is now setup to perform MPC actions with our mobile.
In logs you will notice a hex string of length 66 (33 bytes). This is the YOUR_CLOUD_VERIFYING_KEY_HEX_STRING which will be used by server to verify the requests from other party (In this case, our mobile app).
The Auth-svc server will be accessible at http://localhost:9090.
Duo-server will be accessible at http://localhost:8080.
- The
YOUR_AUTH_SERVICE_ENDPOINTfor iOS applications is0.0.0.0:9090and for Android applications is10.0.2.2:9090. - The
YOUR_CLOUD_NODE_ENDPOINTfor iOS applications is0.0.0.0:8080and for Android applications is10.0.2.2:8080.
Get started on MPC
This guide showcases the @silencelaboratories/silent-shard-sdk for key generation and signing, secured by the new hook-based authentication system.
Install the dependencies
npm install @silencelaboratories/silent-shard-sdk @silencelaboratories/dkls-sdk @silencelaboratories/schnorr-sdk @silencelaboratories/react-native-secure-key react-native-nitro-modules buffer
Configuration Values
You'll need to replace these placeholder values with actual values from your setup:
YOUR_CLOUD_NODE_ENDPOINT: The cloud node endpoint (e.g., localhost:8080)YOUR_AUTH_SERVICE_ENDPOINT: The auth service endpoint (e.g., localhost:9090)YOUR_CLOUD_NODE_VERIFYING_KEY_HEX: The public key of your cloud node, which can be obtained from your Duo Auth Proxy server configuration
Integrate with your React Native app
Create Secure Key in TEE
Secure key is used for identification of the mobile device and secure communication between mobile and cloud node. Using @silencelaboratories/react-native-secure-key library to create ECDSA keypair in the TEE.
- Android uses Android Keystore
- iOS uses Secure Enclave
Let's create a secure key with alias my-key. We need to access this key later to register the device to Auth Service and create a message signer for the duo session for mobile SDK.
Creating Secure Key
import * as SecureKey from "@silencelaboratories/react-native-secure-key";

const KEY_ALIAS = "my-key";

export default function App() {
  React.useEffect(() => {
    SecureKey.createIfNotExistSecureKey(KEY_ALIAS);
  }, []);
}
Create Auth service to handle registrations
AuthService contains APIs to register user and device. Let's create a service to handle the user and device registration.
Create a file AuthService.ts in the services folder.
Show AuthService.ts code
import * as SecureKey from "@silencelaboratories/react-native-secure-key";
import { Buffer } from "buffer";
import { firebaseAuth } from "@/services/FirebaseAuthService";

const YOUR_AUTH_SERVICE_ENDPOINT = "http://192.168.1.16:9090";

export class AuthUser {
  private static async createHttpClient(url: string, options?: RequestInit) {
    const firebaseIdToken = await firebaseAuth.getFirebaseIdToken();
    if (!firebaseIdToken) {
      throw new Error("No Firebase ID token available");
    }
    const endpointUrl = url.replace(/^\/+/g, ""); // Remove leading slashes
    return fetch(`${YOUR_AUTH_SERVICE_ENDPOINT}/${endpointUrl}`, {
      ...options,
      headers: {
        Authorization: `Bearer ${firebaseIdToken}`,
      },
    });
  }

  static async registerUser() {
    const firebaseIdToken = await firebaseAuth.getFirebaseIdToken()!;
    const registerUserRes = this.createHttpClient("/auth/register_user", {
      method: "POST",
      body: JSON.stringify({
        firebaseIdToken,
      }),
    });

    const response = await registerUserRes;
    if (!response.ok) {
      throw new Error("Failed to register user");
    }

    const data = await response.json();
    if (!data.success) {
      throw new Error("User registration unsuccessful");
    }
    return true;
  }

  static async registerDevice(deviceKeyAlias: string): Promise<boolean> {
    const deviceVk = SecureKey.getSecureKey(deviceKeyAlias);
    if (!deviceVk) {
      throw new Error("Failed to get device public key");
    }
    const deviceVKHex = Buffer.from(deviceVk, "base64").toString("hex");

    const challengeRes = await this.createHttpClient(
      `/auth/challenge/${deviceVKHex}`
    );
    if (!challengeRes.ok) {
      throw new Error("Failed to get challenge from server");
    }
    const challengeData = await challengeRes.json();
    const signedChallenge = SecureKey.sign(
      deviceKeyAlias,
      Buffer.from(
        JSON.stringify({ challenge: challengeData.challenge }),
        "utf-8"
      ).toString("base64")
    );
    const signedChallengeHex = Buffer.from(signedChallenge, "base64").toString(
      "hex"
    );

    const registerRes = await this.createHttpClient(`/auth/register_device`, {
      method: "POST",
      body: JSON.stringify({
        device_id: deviceVKHex,
        signature: signedChallengeHex,
      }),
    });
    if (!registerRes.ok) {
      throw new Error("Failed to register device");
    }
    const registerData = await registerRes.json();
    if (!registerData.success) {
      throw new Error("Device registration unsuccessful");
    }
    return true;
  }
}
The @silencelaboratories/react-native-secure-key library return and accept Base64 encoded strings. So we need to convert it to hex string using Buffer package.
Create a session object with messageSigner which will handle MPC operations.
Mobile and Cloud node sign the MPC messages with it's own private key and verify message with public key of the other party. This ensures that the messages are not tampered in transit and are coming from a valid party.
We need to create a messageSigner using the secure key created earlier and pass it to the createEcdsaDuoSession function.
Creating a session
import * as SecureKey from "@silencelaboratories/react-native-secure-key";
import {
  CloudWebSocketClient,
  createEcdsaDuoSession,
} from "@silencelaboratories/silent-shard-sdk";

const KEY_ALIAS = "my-key";

const createSession = async () => {
  const messageSigner = SecureKey.createMessageSigner(KEY_ALIAS);
 const client = new CloudWebSocketClient("YOUR_CLOUD_NODE_ENDPOINT", false);

  const session = await createEcdsaDuoSession({
    client,
    cloudVerifyingKey: "YOUR_CLOUD_NODE_VERIFYING_KEY_HEX",
    messageSigner,
  });

  return session;
}
Configure the YOUR_CLOUD_NODE_ENDPOINT and YOUR_CLOUD_NODE_VERIFYING_KEY_HEX with previously obtained values from the Docker compose logs.
Test out MPC operations
With the session object is configured, you can now perform key generation and signing.
Adding MPC operations
const session = await createSession();

const keyshare = await session.keygen();

const signature = await session.sign({
  keyshare,
  // Keccak256 Hash("Trusted Third Parties are Security Holes")
  messageHash: "53c48e76b32d4fb862249a81f0fc95da2d3b16bf53771cc03fd512ef5d4e6ed9"
});
Full example
- Secure key creation
- Google Sign-In and Firebase authentication
- User and device registration to Auth Service
- Key and signature generation using Silent Shard SDK
- With some UI to show the status and results
Full example code for app/(tabs)/index.tsx:
index.tsx code
import { AuthUser } from "@/services/AuthSevice";
import { firebaseAuth } from "@/services/FirebaseAuthService";
import * as SecureKey from "@silencelaboratories/react-native-secure-key";
import {
  CloudWebSocketClient,
  createEcdsaDuoSession,
} from "@silencelaboratories/silent-shard-sdk";
import { StatusBar } from "expo-status-bar";
import React from "react";
import { Pressable, StyleSheet, Text, View } from "react-native";

const KEY_ALIAS = "my-key";

type MpcInfo = {
  isPending: boolean;
  keygen?: {
    time: number;
    publicKeyHex: string;
  };
  sign?: {
    time: number;
    signatureHex: string;
  };
};

type AuthStatus = {
  loggedIn: boolean;
  isPending: boolean;
};

const createSession = async () => {
  const messageSigner = SecureKey.createMessageSigner(KEY_ALIAS);
  const client = new CloudWebSocketClient("YOUR_CLOUD_NODE_ENDPOINT", false);

  const session = await createEcdsaDuoSession({
    client,
    cloudVerifyingKey: "YOUR_CLOUD_NODE_VERIFYING_KEY_HEX",
    messageSigner,
  });

  return session;
};

export default function Index() {
  const [authStatus, setAuthStatus] = React.useState<AuthStatus>({
    loggedIn: false,
    isPending: false,
  });
  const [mpcInfo, setMpcInfo] = React.useState<MpcInfo>({
    isPending: false,
  });

  React.useEffect(() => {
    SecureKey.createIfNotExistSecureKey(KEY_ALIAS);
  }, []);

  const handleLogin = React.useCallback(async () => {
    try {
      setAuthStatus((p) => ({ ...p, isPending: true }));
      await firebaseAuth.signInWithGoogle();
      await AuthUser.registerUser();
      await AuthUser.registerDevice(KEY_ALIAS);
      setAuthStatus((p) => ({ ...p, loggedIn: true }));
    } catch (e) {
      console.error("Login failed:", e);
    } finally {
      setAuthStatus((p) => ({ ...p, isPending: false }));
    }
  }, []);

  const handleMpcOperations = React.useCallback(async () => {
    try {
      setMpcInfo({ isPending: true });
      const session = await createSession();

      let startTime = Date.now();
      const keyshare = await session.keygen();
      const keygenTime = Date.now() - startTime;

      startTime = Date.now();
      const signature = await session.sign({
        keyshare,
        // Keccak256 Hash("Trusted Third Parties are Security Holes")
        messageHash:
          "53c48e76b32d4fb862249a81f0fc95da2d3b16bf53771cc03fd512ef5d4e6ed9",
      });
      const signTime = Date.now() - startTime;

      setMpcInfo((p) => ({
        ...p,
        keygen: { time: keygenTime, publicKeyHex: keyshare.publicKeyHex },
        sign: { time: signTime, signatureHex: signature },
      }))

      await keyshare.free();
    } catch (e) {
      console.error("MPC operations failed:", e);
    } finally {
      setMpcInfo((p) => ({ ...p, isPending: false }));
    }
  }, []);

  return (
    <View style={styles.appContainer}>
      <Text style={styles.title}>Silent Shard SDK + Auth Service </Text>

      <View style={styles.container}>
        {!authStatus.loggedIn && (
          <Pressable
            disabled={authStatus.isPending}
            onPress={handleLogin}
            style={({ pressed }) => [
              styles.buttonContainer,
              pressed && styles.buttonPressed,
            ]}
          >
            <Text style={styles.buttonText}>Sign in with Google</Text>
          </Pressable>
        )}

        {authStatus.loggedIn && (
          <>
            <Pressable
              disabled={mpcInfo.isPending}
              onPress={handleMpcOperations}
              style={({ pressed }) => [
                styles.buttonContainer,
                pressed && styles.buttonPressed,
              ]}
            >
              <Text style={styles.buttonText}>Run MPC operations</Text>
            </Pressable>

            {mpcInfo.isPending && (
              <View style={styles.loadingContainer}>
                <Text style={styles.loadingText}>Operation in progress...</Text>
              </View>
            )}

            {mpcInfo.keygen && (
              <View style={styles.resultCard}>
                <Text style={styles.cardTitle}>Key Generation</Text>
                <View style={styles.dataRow}>
                  <Text style={styles.dataLabel}>Public Key:</Text>
                  <Text style={styles.dataValue}>
                    {mpcInfo.keygen.publicKeyHex}
                  </Text>
                </View>
                <View style={styles.dataRow}>
                  <Text style={styles.dataLabel}>Time:</Text>
                  <Text style={styles.dataValue}>{mpcInfo.keygen.time}ms</Text>
                </View>
              </View>
            )}

            {mpcInfo.sign && (
              <View style={styles.resultCard}>
                <Text style={styles.cardTitle}>Signature Generation</Text>
                <View style={styles.dataRow}>
                  <Text style={styles.dataLabel}>Signature:</Text>
                  <Text style={styles.dataValue}>
                    {mpcInfo.sign.signatureHex}
                  </Text>
                </View>
                <View style={styles.dataRow}>
                  <Text style={styles.dataLabel}>Time:</Text>
                  <Text style={styles.dataValue}>{mpcInfo.sign.time}ms</Text>
                </View>
              </View>
            )}
          </>
        )}
      </View>
      <StatusBar style="auto" />
    </View>
  );
}

const styles = StyleSheet.create({
  appContainer: {
    flex: 1,
    backgroundColor: "#fff",
    paddingVertical: 100,
    paddingHorizontal: 20,
    gap: 20,
  },
  title: {
    fontSize: 20,
    fontWeight: "bold",
    textAlign: "center",
  },
  container: {
    flex: 1,
    justifyContent: "center",
  },
  buttonContainer: {
    alignItems: "center",
    backgroundColor: "#007bff",
    borderRadius: 5,
    marginHorizontal: 10,
    padding: 15,
    width: "100%",
  },
  buttonPressed: {
    opacity: 0.8,
  },
  buttonText: {
    color: "white",
    fontWeight: "bold",
    fontSize: 16,
  },
  loadingContainer: {
    padding: 16,
    alignItems: "center",
    marginVertical: 8,
  },
  loadingText: {
    color: "#666",
    fontSize: 14,
    fontStyle: "italic",
  },
  resultCard: {
    backgroundColor: "white",
    borderRadius: 12,
    padding: 16,
    marginVertical: 8,
    shadowOffset: { width: 0, height: 2 },
    shadowOpacity: 0.1,
    shadowRadius: 4,
    elevation: 3,
    borderLeftWidth: 4,
    borderLeftColor: "#007AFF",
  },
  cardTitle: {
    fontSize: 16,
    fontWeight: "bold",
    color: "#333",
    marginBottom: 12,
  },
  dataRow: {
    flexDirection: "row",
    justifyContent: "space-between",
    alignItems: "flex-start",
    marginBottom: 8,
  },
  dataLabel: {
    fontSize: 14,
    fontWeight: "600",
    color: "#666",
    flex: 1,
  },
  dataValue: {
    fontSize: 12,
    color: "#333",
    flex: 2,
    textAlign: "right",
    fontFamily: "Courier New",
    lineHeight: 16,
  },
});
Run the app
Let's see MPC in action! Make sure your development environment is properly set up for native builds.
Make sure native dependencies are installed:
# Generate the native iOS and Android directories
npx expo prebuild --clean

# Build and run the app on your preferred platform
npx expo run:android
# or
npx expo run:ios
Once the app launches:
- Tap the "Sign in with Google" button to authenticate
- After successful login, tap the "Run MPC operations" button
- Observe the key generation and signature results displayed on the screen