Quick Start
If you don't have have access to the docker image or don't have access to the iOS sdk repository, please contact us at info@silencelaboratories.com.
Here is how you can setup the Mobile SDK and perform MPC operations in less than a minute.

You will create a working MPC two-party setup, where the first party, an iOS application interacts with Duo Server as a second party. We are providing a demo server endpoint for your convenience.
Prerequisites
For quick testing, the demo server is already deployed at demo-server.silencelaboratories.com. We are using this server for the quickstart guide.
The Cloud Verifying Key for the demo server is 01829099948d222f9731323900bc42bd3cc6f4e692f920705a9959b3e52378f188.
The Cloud Node Endpoint for the demo server is demo-server.silencelaboratories.com.
Setup the Mobile SDK (iOS)
Create a new XCode project by following the official guide or use existing one.
Dependency Installation
Step 1: Create Package URL
- Get access to the repository https://github.com/silence-laboratories/silentshard-artifacts from the Silence Laboratories team.
- Get the package URL
- Add GitHub account : Skip this step if you already have added your GitHub account in Xcode. You can add your GitHub account by following the steps ( only until it adds your GitHub account).
- Final package URL: https://github.com/silence-laboratories/silentshard-artifacts.
Step 2: Open Package(SPM) Collection Window
- In Xcode, open the Project Navigator.
- Select the project file (the root item in the navigator).
- In the Project Editor, select your project(Your Xcode Project title under
Projectsection). - Navigate to the Package Dependencies tab. See below
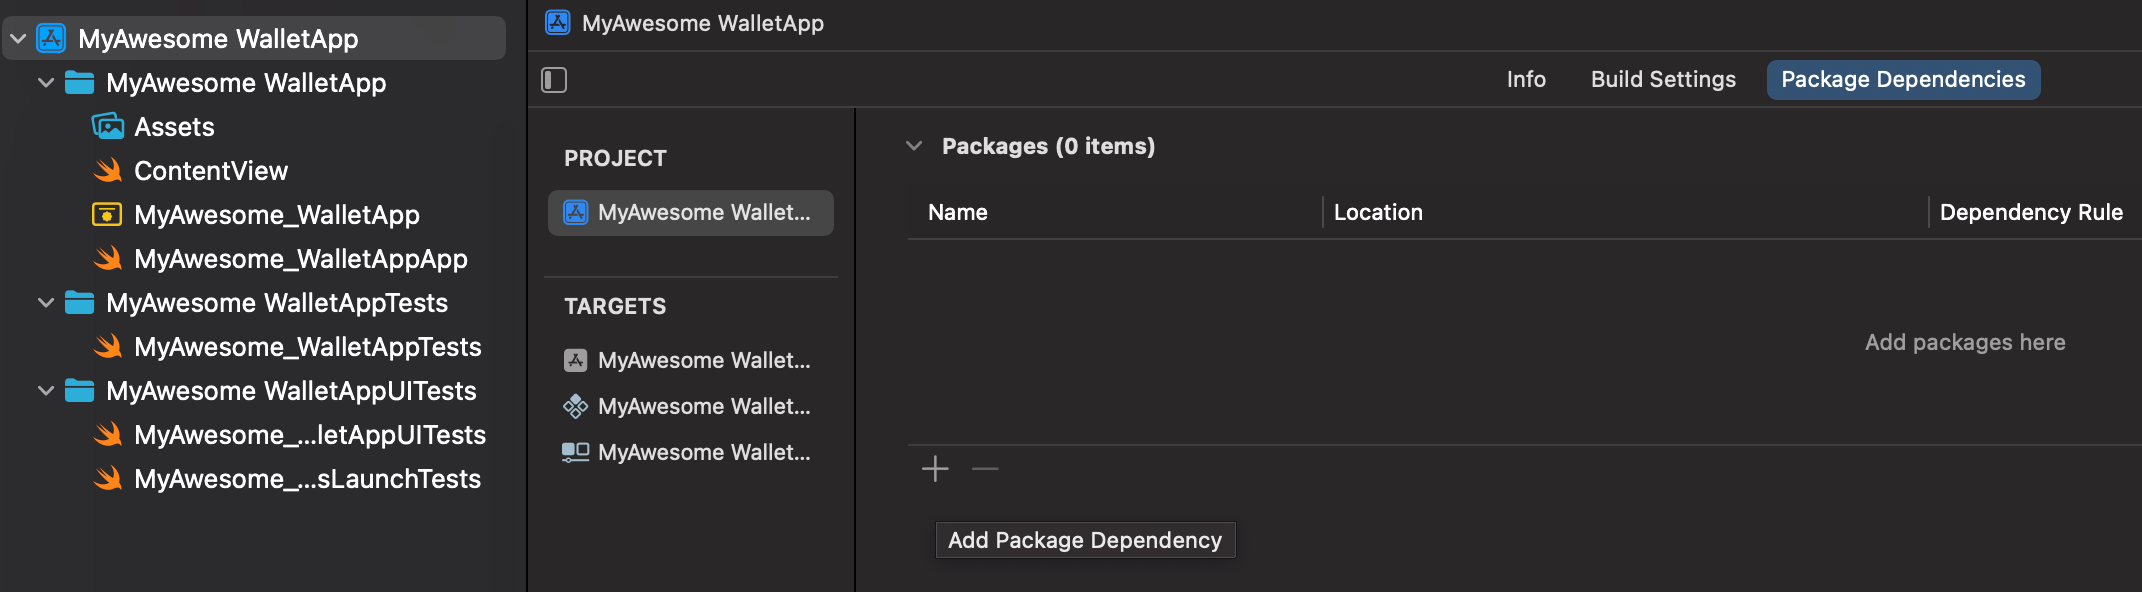
- Click the + icon (hint :Add Package Dependency) at the bottom of the Package Dependencies section.
- A dialog box will appear prompting you to enter a package URL.
Step 3: Add Package
- Copy the package URL (We get this from Step 2).
- Paste this URL into the
Search or Enter Package URLbox.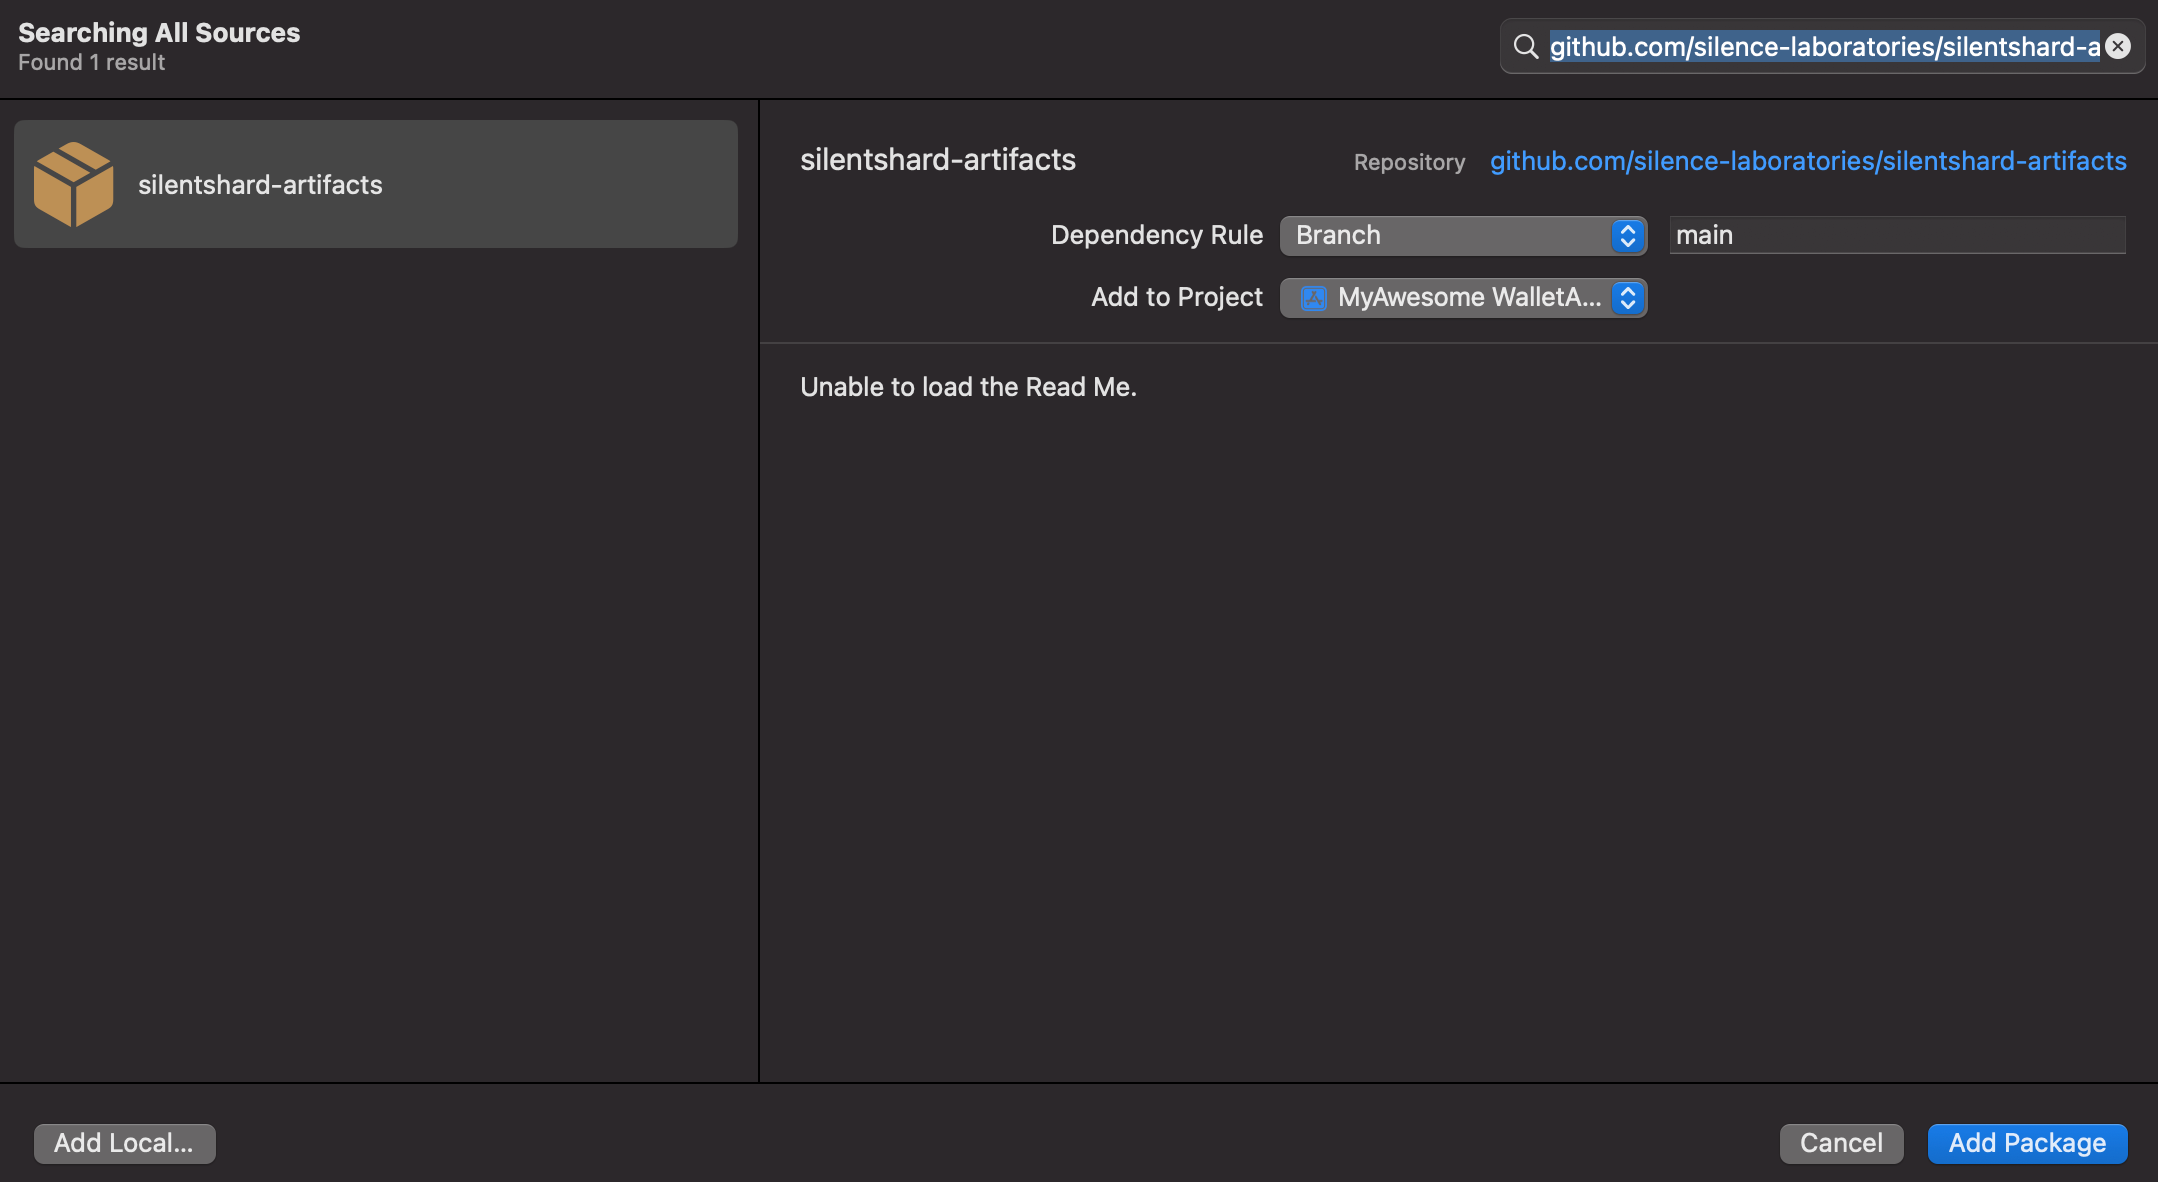
- Select the
silentshard-artifactson the left panel. - Click Add Package to proceed.
Step 4: Confirm and Add Package
- Xcode will fetch the package details.
- Add library (silentshardduo, c2dkls, duo_schnorr) to your targets By clicking dropdown from the "
Add to Target" items.
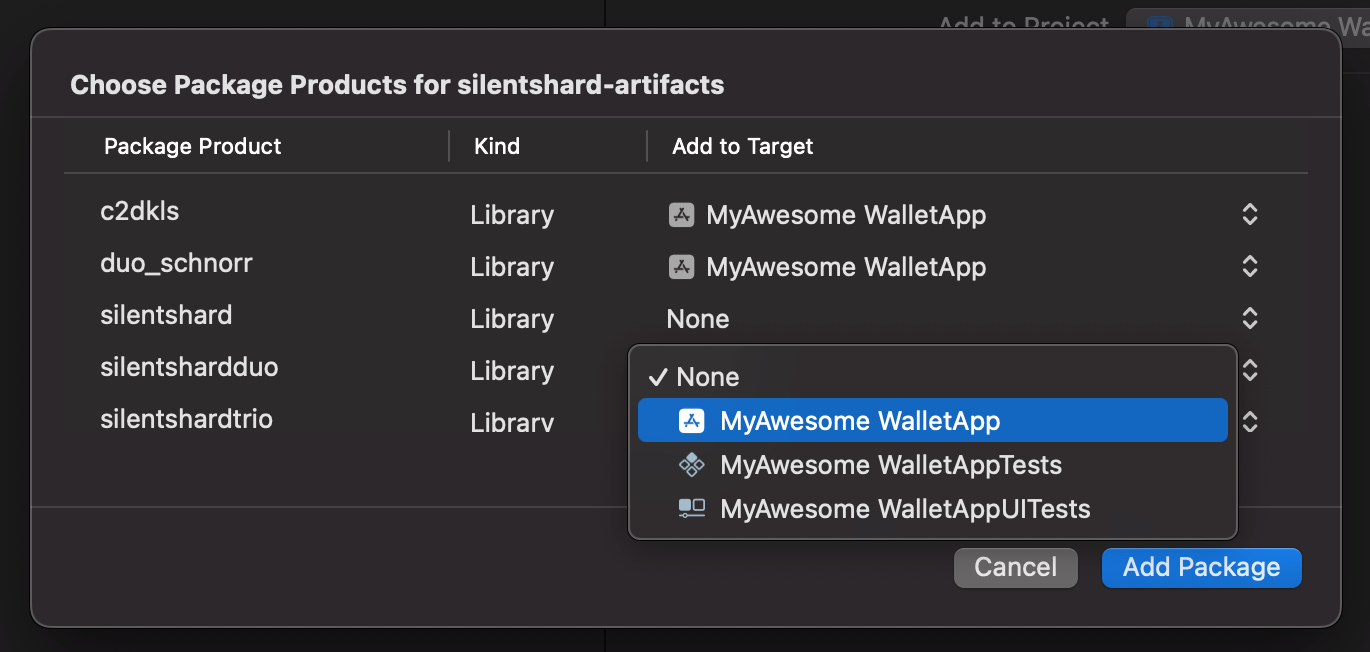
- Click Add Package to complete the installation.
Session Creation
Instantiate DuoSession object, which could be used to perform all of the supported MPC operations such as keygen, sign etc.
import silentshardduo

class CustomStorageClient: StorageClient {

    /*
     * Representing in-memory database. In real world it should be some SQL based DB or
     * secure storage or custom hardware. It's up to the implementation app's use-case.
     */
    private var keyshareDaoSet: Set<ReconcileStoreDao> = []

    func write(dao: ReconcileStoreDao) async {
        if !keyshareDaoSet.insert(dao).inserted {
            keyshareDaoSet.remove(dao)
            keyshareDaoSet.insert(dao)
        }
    }

    func read(key: String) async throws -> ReconcileStoreDao? {
        return keyshareDaoSet.first { $0.keyId == key }
    }
}
import silentshardduo

let CLOUD_NODE_URI = "demo-server.silencelaboratories.com"
//let PORT = "8080"

//Other party verifying-key/public-key
let cloudVerifyingKey = "01829099948d222f9731323900bc42bd3cc6f4e692f920705a9959b3e52378f188"

//Create websocketConfig to let SilentShard use default WebsocketClient.
let websocketConfig: silentshardduo.WebsocketConfig =
    WebsocketConfigBuilder()
        .withBaseUrl(CLOUD_NODE_URI)
        //If applies
        //.withPort(PORT)
        // false if local development server without SSL
        .withSecure(true)
        //If applies
        //.withAuthenticationToken("")
        .build()

//Create storage client instance to manage keyshare state
let storageClient = CustomStorageClient()

//Create duoSession

/*
We only have to pass websocketConfig which contains the server config and
communication will be handled by internal websocketClient*/
let duoSession = SilentShard.ECDSA.createDuoSession(
    cloudVerifyingKey: String(cloudVerifyingKey),
    websocketConfig: websocketConfig,
    storageClient: storageClient)
/*
//or for EdDSA algorithm
let duoSession = SilentShard.EdDSA.createDuoSession(
    cloudVerifyingKey: String(cloudVerifyingKey),
    websocketConfig: websocketConfig,
    storageClient: storageClient)
*/
Run the MPC operations
After creating the session, you can perform MPC operations.
Key Generation
Generate MPC keyshares and return the client keyshare with keygen method.
let result: Result<Data, any Error> = await duoSession.keygen()
switch result {
    case .success(let dataBytes):
        do {
            // do something with keyshare dataBytes
            Swift.print(dataBytes)
            return dataBytes
        }
    case .failure(let error):
        do {
            // show error to user or abort process
            Swift.print(error)
            return nil
        }
}
Signature Generation
Sign a message using the signature method.
let messageHash = "53c48e76b32d4fb862249a81f0fc95da2d3b16bf53771cc03fd512ef5d4e6ed9"
let result = await duoSession.signature(
            keyshare: keyshare,
            message: messageHash,
            chainPath: "m"  // This is the default, use your desired path here. For e.g 'm/1/2'
        )
switch result {
    case .success(let dataBytes):
        do {
            // do something with signature dataBytes
            Swift.print(dataBytes)
            return dataBytes
        }
    case .failure(let error):
        do {
            // show error to user or abort process
            Swift.print(error)
            return nil
           }
}
Complete Code Example
import silentshardduo

class CustomStorageClient: StorageClient {

    /*
     * Representing in-memory database. In real world it should be some SQL based DB or
     * secure storage or custom hardware. It's up to the implementation app's use-case.
     */
    private var keyshareDaoSet: Set<ReconcileStoreDao> = []

    func write(dao: ReconcileStoreDao) async {
        if !keyshareDaoSet.insert(dao).inserted {
            keyshareDaoSet.remove(dao)
            keyshareDaoSet.insert(dao)
        }
    }

    func read(key: String) async throws -> ReconcileStoreDao? {
        return keyshareDaoSet.first { $0.keyId == key }
    }
}
import SwiftUI
import silentshardduo

struct ContentView: View {

    let CLOUD_NODE_URI = "demo-server.silencelaboratories.com"
    //let PORT = "8080"

    //Other party verifying-key/public-key
    let cloudVerifyingKey = "01829099948d222f9731323900bc42bd3cc6f4e692f920705a9959b3e52378f188"

    //Create websocketConfig to let SilentShard use default WebsocketClient.
    let websocketConfig: silentshardduo.WebsocketConfig =
        WebsocketConfigBuilder()
            .withBaseUrl(CLOUD_NODE_URI)
            //If applies
            //.withPort(PORT)
            // false if local development server without SSL
            .withSecure(true)
            //If applies
            //.withAuthenticationToken("")
            .build()

    //Create storage client instance to manage keyshare state
    let storageClient = CustomStorageClient()

    //Create duoSession

    /*
    We only have to pass websocketConfig which contains the server config and
    communication will be handled by internal websocketClient*/
    let duoSession = SilentShard.ECDSA.createDuoSession(
        cloudVerifyingKey: String(cloudVerifyingKey),
        websocketConfig: websocketConfig,
        storageClient: storageClient)
    /*
    //or for EdDSA algorithm
    let duoSession = SilentShard.EdDSA.createDuoSession(
        cloudVerifyingKey: String(cloudVerifyingKey),
        websocketConfig: websocketConfig,
        storageClient: storageClient)
    */

    var body: some View {
        VStack {
            Image(systemName: "globe")
                .imageScale(.large)
                .foregroundStyle(.tint)
            Text("Hello, world!")
            Button("Tap me") {
                Task {
                    let result: Result<Data, any Error> = await duoSession.keygen()
                    switch result {
                    case .success(let keyshareDataBytes):
                        do {
                            // do something with keyshare dataBytes
                            let messageHash = "53c48e76b32d4fb862249a81f0fc95da2d3b16bf53771cc03fd512ef5d4e6ed9"
                            let signatureResult = await duoSession.signature(
                                keyshare: keyshareDataBytes,
                                message: messageHash,
                                chainPath: "m"  // This is the default, use your desired path here. For e.g 'm/1/2'
                            )
                            switch signatureResult {
                            case .success(let signatureDataBytes):
                                do {
                                    // do something with signature dataBytes
                                    Swift.print(signatureDataBytes)
                                    return signatureDataBytes
                                }
                            case .failure(let error):
                                do {
                                    // show error to user or abort process
                                    Swift.print(error)
                                    return nil
                                }
                            }
                        }
                    case .failure(let error):
                        do {
                            // show error to user or abort process
                            Swift.print(error)
                            return nil
                        }
                    }
                }
            }
        }
        .padding()
    }
}
Once the app launches, check your console logs to see the key generation and signing process updates in real-time.
Optional: Run your own Duo Server
Install Docker
- Linux
- macOS
- Windows
curl -fsSL https://get.docker.com | sh
Download and install Docker Desktop from the official website.
Alternatively, you can install using Homebrew:
brew install --cask docker
Download and install Docker Desktop from the official website.
Make sure to enable WSL 2 backend during installation for better performance.
Install OpenSSL
- Linux
- macOS
- Windows
# Ubuntu/Debian
sudo apt-get update && sudo apt-get install openssl
OpenSSL is usually pre-installed on macOS. To install or update using Homebrew:
brew install openssl
Download and install from the official OpenSSL website.
Alternatively, you can install using Chocolatey:
choco install openssl
Or using Windows Package Manager:
winget install OpenSSL.OpenSSL
Generate GitHub Personal Access Token
Get a Personal Access Token from GitHub if you don't have one.
Guide to generate GitHub Personal Access Token
- Go to GitHub Personal Access Tokens
- Click on "Generate new token", we are using the classic token for this guide.
- Enter a name for the token
- Select the "read::packages Download packages from GitHub Package Registry" scope.
- Generate the token.
Login to Docker Registry
Login to docker using Personal Access Token and your GitHub username.
echo <PAT> | docker login ghcr.io -u <username> --password-stdin
Start the Server
For local setup, let's use this example docker-compose.yml
services:
  duo-server:
    image: ghcr.io/silence-laboratories/dkls23-rs/duo-server:v4
    command: /usr/local/bin/sigpair-node
    environment:
      RUST_LOG: info
      LISTEN: 0.0.0.0:8080
      DEV_MASTER_SIGN_KEY: /run/secrets/duo-signing-master-key
      FILE_STORAGE_URL: file:///data/
    ports:
      - 8080:8080
    volumes:
      - duo-server-data:/data
    secrets:
      - duo-signing-master-key

volumes:
  duo-server-data:

secrets:
  duo-signing-master-key:
    file: ${MESSAGE_SIGNING_KEY:-./party_0_sk}
The docker compose file is configured to use the party_0_sk file in the root of the project. party_0_sk is the random bytes used as seed to create the server private key.
Create the party_0_sk file with random bytes in the root of the project.
openssl rand 32 > party_0_sk
Now let's start the server by running
docker compose up
If everything was setup correctly, the server should be running with these logs
Attaching to duo-server-1
duo-server-1  | WARN: The dotenv file is not set
duo-server-1  | 2025-09-16T09:59:09.200234Z  INFO sigpair_node: Creating SimpleStorage
duo-server-1  | 2025-09-16T09:59:09.201975Z  INFO sigpair_node: Party VK <YOUR_CLOUD_VERIFYING_KEY_HEX_STRING>
duo-server-1  | 2025-09-16T09:59:09.202413Z  INFO sigpair_node: listening on 0.0.0.0:8080
Great! The server is now setup to perform MPC actions with our mobile.
In logs you will notice a hex string of length 66 (33 bytes). This is the YOUR_CLOUD_VERIFYING_KEY_HEX_STRING which will be used by server to verify the requests from other party (In this case, our mobile app).
The YOUR_CLOUD_NODE_ENDPOINT is the endpoint of the server. In this case, it is 0.0.0.0:8080 for ios and 10.0.2.2:8080 for android. Also you can use the IP address of your machine if you are running the server on your machine.
Second argument of the CloudWebSocketClient constructor is a boolean indicates if the connection is WSS or WS. Use true for secure connection, otherwise use false for local server.